bookmark_borderGuide To Finding Hardwood Flooring For Bedrooms

How to Choose the Right Hardwood Floor

Wondering how to choose the right hardwood floor for you? If so, you already know that choosing hardwood flooring is a great investment. They are durable, easy to clean, and can drastically increase your property’s value. Whether you are moving into a fixer-upper, or just looking for a change, figuring out how to choose the right hardwood floor for your lifestyle is a must. Owning pets, living near the beach, or having a smaller space can all influence your decision. This guide will help you choose between solid or engineered hardwood, and walk you through the advantages of different hardwood species (yes, we said species) so that you can pick the right kind for your home.

First, let’s go over the types of hardwood flooring that exist.

Types of Hardwood Floor

When considering how to choose a hardwood floor, first consider the two main types of hardwood — solid hardwood and engineered hardwood. Both types of flooring have their advantages and disadvantages, depending on where your home is located and how much foot traffic your hardwood floor will be subject to.

Solid hardwood is exactly what it sounds like. Each board is made of a single plank of solid wood. They are usually ¾ of an inch thick, meaning that they can be sanded down and refinished time and time again.

Engineered hardwood, on the other hand, is manufactured wood. The top and bottom layers are about 4mm thick and made of natural wood from different species. The middle of each plank is built of five to seven layers of man-made plywood, making them stable and resilient.


Choose the right size

Board size is another important consideration. Narrow boards are less expensive, but many people prefer the aesthetic of wider boards, which reduce the number of seams in the floor. The same idea applies to shorter versus longer boarders. The wider and longer a board is, the more expensive it is per square foot and the larger percentage of extra flooring you need to ensure it fits your room. A standard measure is to purchase 10% more square footage than you need, but this may increase depending on the shape of the room.

Compare hardwood floor costs

Costs can range from $1.75 per square foot up to $9 or more, depending on factors like species, width, and type. While engineered hardwood flooring is typically less expensive, the cost compared to solid flooring of the same species is usually just around $1 less per square foot. Additionally, prefinished wood may add another $1 per square foot compared to unfinished wood, but it also means you won’t need to finish it after installation.One of the most popular species, Red Oak, runs about $4 per square foot unfinished and $5 prefinished, with additional costs for wider boards. More exotic woods or those that are harder and more resistant to wear are more expensive, while softer woods are typically cheaper.

Read hardwood floor reviews

Be sure to investigate the suppliers of hardwood floors, reading reviews and comparing different qualities. Some suppliers specialize in inexpensive flooring, while others offer a wide range of prices. You should also look for reviews on issues like warranties, shipping costs, and available widths. In addition to customer reviews, you should read reviews from contractors who can offer the perspective of someone who handles hardwood floors frequently.


Why choose engineered wood flooring?

More and more people are choosing to fit engineered wooden flooring as opposed to solid timber floors — and there are many reasons for this decision.

Engineered flooring is available in an extremely wide range of timbers to suit any home, with various effects, such as ‘aged’ and ‘sun bleached’, available. They are also suitable for laying over many types of existing floor, such as concrete, unlike most solid boards.

In addition, most engineered flooring now comes pre-finished, meaning no waxing, lacquering or oiling for you, and a floor that is ready to walk on as soon as it has been laid. Plus, it is simple to lay on a DIY basis, so labour costs are saved.

How long will it last?

This very much depends on what kind of wear the floor sees and how thick the top layer of solid wood is. Guarantees vary from ten to 30 years.

The number of times a floor can be sanded and refinished also varies — the manufacturers’ recommendations should be taken on this one. Some may recommend sanding no more than three times for thicknesses of 15mm. Generally, a professional sanding will remove around 0.5mm of the surface layer. However, bear in mind that some beautiful hardwood floors won’t ever have been sanded and that dents and scratches can add to their character.

You get what you pay for… The cheapest floors tend to have a very thin top layer – as thin as 0.6mm – a minimal number of veneers in the core and fewer finishing layers.

  • The general rule is, the more layers the floor is made up of, the better.
  • At the lower end of the market, boards have a three-ply construction, are around 1/4 inch thick in total, have a 1-2mm topwear layer, and around five finish coats.
  • Next best are of five-ply construction, with a 3mm top layer, around seven finish coats, and a total thickness of ½ inch.
  • The best quality floors are made of up to nine plies, have a 7mm plus top layer, have around nine finish coats and are a total thickness of approximately ¾ inch.


Width of Boards

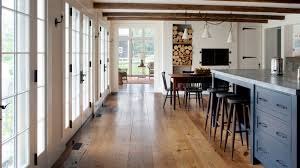
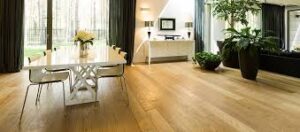
The width of your hardwood boards will have a dramatic impact on the final look of your flooring. If you would like your flooring to visually expand the spaciousness of your room, you may want to select a narrow board width. Wider boards will provide your interior spaces with a cottage or country feel. You may want to try laying out certain board widths to see what they look like in your space.

Species of Wood

The species of the wood is another critical factor that you will need to take into account when you are shopping for new hardwood floors. Each species of hardwood has unique characteristics, including particular grains, strengths, and colors. Some popular hardwood species for homes include oak wood and cherry wood. To provide your floors with a unique flair, you can also consider unusual or luxurious hardwood species, such as mahogany.

Flooring Finishes

Your flooring finish will have a large impact on the final look of your hardwood floors. Natural hardwood floors can be finished using special stains or urethane products. Ideally, your finish should match with the overall look and color scheme of your home. To cut down on your installation time, you can also choose to install prefinished or engineered wood floors. Engineered hardwood floors will arrive at your home already finished, so they will be ready for use as soon as they have been installed.


How to Choose a Hardwood Floor that Fits your Style

Consider color, finish, and texture

Hardwood floors might be timeless, but they still go through trends. When figuring out how to choose a hardwood floor, remember your personal style along with your lifestyle. That way you will pick a flooring that will grow with you, your lifestyle, and your taste over time.

You can choose between various stains, finishes, and textures to create the look and feel you want for your home. If you have a small space, for example, you might want to consider a lighter stain such as blonde or even whitewash. If you prefer a more classic look, dark floors can be a good option. Keep in mind, however, that they are surprisingly hard to keep clean, and notorious for highlighting scratches.

Beyond color choices, you have finish options like glossy, matte and satin. How do you choose a finish for your hardwood floor? Most people steer clear of glossy these days, opting for the more natural-looking matte and satin finishes. If you like a little gleam to your floors, without the roller rink glare, satin could be the finish for you. It has just enough shine to add dimension, without making itself the star of your living room.

If you want an even more subtle, natural finish, matte would be your go-to. This finish gives hardwood floors a fresh, natural look. It adds a clean and contemporary quality to any room and, as a bonus, matte floors show the least amount of dirt and dust of any finish.

Now that you’ve selected your color and finish, you might be wondering how to choose a hardwood floor texture. There are four primary options when it comes to hardwood texture. The tried and true smooth wood is still going strong and is now accompanied by hand-scraped, wire-brushed, and distressed wood. After smooth wood, wire-brushed is the next most subtle. It leaves fine scratches in the wood, for a more natural look, whereas hand-scraped wood leaves each board with different ridges. Distressed wood has the most character, as the planks’ knots, scrapes, and wormholes are made more prominent.

bookmark_borderSecrets You Must Know To Choose A Good Wedding Photographer

How to Choose Your Wedding Photographer

After the hundreds of hours spent planning and preparing for your wedding, the actual day itself will likely go by in a total whirlwind. Once the I-do’s have been said and done, you’ll be swept away celebrating with friends and family, making speeches, cake cutting, and dancing like there’s no tomorrow!

With all the excitement of the big day, it’s hard to find a spare five minutes to stop and soak up every little detail. This is why your wedding photos are so important. While the day might fly by quickly, your photos are going to be the lasting memories of an amazing day that you’ll treasure forever.

With this in mind, choosing your wedding photographer is kind of a big deal. With hundreds of wedding photographers to choose from, how do you find the photographer whose style will capture your big day exactly as you’d hoped? Not to mention someone that you and your partner will be able to connect with and feel totally comfortable around?

Your wedding photographer should be one of the most carefully researched suppliers you book for your big day. Making sure you have an amazing wedding photographer to capture every carefully planned detail and intimate moment is one of the best investments you’ll make.

If this is starting to sound like an overwhelming task, don’t stress. We’ve compiled some helpful tips to make sure you choose the perfect wedding photographer like a pro!

Define your photography style

First things first – you need to decide exactly what you’re looking for in a photographer before you go any further! In today’s modern world, it’s not just as simple as clicking the shutter button. There are many different styles of photography, with certain photographers that specialise in each one.

Some of the most popular wedding photography styles to choose from include:

  • Fine art: this photography style is soft, romantic and filled with light. Many fine art photographers will shoot using film, or a mix of film and digital.
  • Traditional: usually heavily posed, portrait style shots. Most traditional photographers will also airbrush and edit your images to give a very polished end result. Think about the imagery you see in glossy, high-end wedding magazines.
  • Documentary: a strong focus on capturing spontaneous, candid moments and emotions and telling the story of your day, as opposed to staged shots. There will be little interference from the photographer, in fact, you might not even notice them for the whole day!

When it comes to the style of photography, stop and think about what is important to you both. Do you want beautiful, slightly glamorous and posed shots of you as a couple? Or would you prefer candid, behind-the-scenes snaps? Do you want the end result to be flawlessly airbrushed, or totally raw and natural?

If you have already defined your wedding vision, you should have a general idea of the kind of look and feel you’d like your wedding photos to represent, so this is usually a good place to start.

Define your photography requirements

Once you’ve decided on your ideal photography style, you’ll also want to figure out exactly which aspects of your day you want to be captured professionally. Most photographers will offer different packages based on the hours required, so try to identify exactly what you need (and what you don’t!).

Visualise your day from start to finish and try to identify which areas you definitely want to be covered. This could include:

  • Bride and bridal party getting ready
  • Groom and groomsmen getting ready
  • Venue location shots
  • Detailed decor shots – like your table settings, floral arrangements, seating chart.
  • Bridal party transport to the venue
  • First look
  • Wedding ceremony
  • Bride and groom portraits
  • Bridal party portraits
  • Family portraits
  • Pre-dinner drinks
  • Dinner
  • Dancing

Keep in mind too that if you have a long list of detailed shots you want to be captured, your photographer may need to organise a second shooter. For example, if you want a shot of you walking down the aisle, along with a photo of your partner’s face when he sees you for the first time – you can see how that would be a little tricky for one person to be capturing both of these moments simultaneously! It goes without saying that the more coverage you need and and the more detail you request, the more hours you will need to pay for your photographer.


Do the research

Now that you know exactly what you want in your wedding photographer, it’s time to do the research!

Referrals are a great place to start. If you have friends or family whose wedding photos you absolutely adored, ask for their recommendations! It can also be helpful to gather referrals from any vendors who you have already booked, like your venue or your wedding planner. It’s likely they have worked alongside many different photographers in the past and can help you narrow down your search.

Alternatively, hop onto social media or a search engine and start hunting for photographers in your local area. All good photographers will have an easily accessible online portfolio that you can browse through to get a sense of their work. If they have a blog, this is a great indication to see how they capture a wedding from beginning to end.

Meet in person

Your wedding photographer is going to be an integral part of your big day, so make sure you meet them face to face where possible! You’ll want to see how well you get along and if you and your partner can form a genuine connection with them.

Keep in mind that your wedding photographer is going to be present for some pretty intimate moments, so it goes without saying that you want to feel relaxed and comfortable. If you feel awkward or uncomfortable around your photographer, this will definitely come across in your photos.

When you meet with your wedding photographer for the first time, it’s a good idea to ask some important questions upfront so that you have a clear understanding of how they work and the expectations of both parties.


These Ten Things You Should Know Before You Photograph Any Wedding

To Keep Those Lines Of Communication Open.

  1. Family Details & Dynamics

In this day and age, it’s more than likely your clients will have step parents, and step siblings, and with that will come estranged family members. On the first page of my pre-wedding client questionnaire, I have them list out their immediate family members as well as a space that asks them if there is anything I should know in terms of family members that would prefer not to be photographed together, family issues that might affect portraits, etc. I’d rather walk in and know what’s happening instead of assuming everyone gets along and is one big happy family.

  1. Names of all in the Wedding Party

As I’ve gotten older, I’ve lost my ability to remember anything…names particularly. If I meet a group of people, I won’t remember anyone’s names, but if I have a list of all the people in the wedding party, it helps. I will, at least, memorize the names of the Best Man and Maid of Honor and then as many of the bridesmaids and groomsmen as possible. Plus, I’ll already have seen some of the names which, in theory, should help them stick in my memory.

  1. Phone Numbers of Day Of Contact People

Aside from the wedding planner (if they have one), who are the main contact people the day of the wedding? Usually, it’s the Maid of Honor, Best Man, the bride’s mother or a sibling. A bride and groom may not have their phones handy throughout the day, and there may be a need to get a hold of someone besides the planner. Keep these numbers handy; you never know when you might need them.

  1. A List of All The Vendors

On the last page of the questionnaire, I ask for a list of vendors from the florist to the DJ to the person who made the invitations. I’ll send the people I’ll be working with directly an email introduction and I’ll also include the wedding photography timeline. It’s always nice to work with friendly vendors, and I find that just a quick introduction paves the way for a great wedding day working relationship.


QUESTIONS FOR YOUR WEDDING PHOTOGRAPHER

General – What You Need to Know

Wedding Photography is no easy subject and interviewing potential wedding photographers can be a daunting task. Regardless of if you are hiring the Lin and Jirsa Wedding Photography Team or another studio, we have created a list of 15 questions to help you find the perfect photographer for your wedding day.

While this list consists the exact reference of what questions to ask, you still need to pay attention to the soft-skills that are mentioned in “How Do I Choose a Wedding Photographer” during the meeting and conversation.

What is your primary style?

This should be your first and foremost question as this is the style of photography that interests you. Lin and Jirsa Wedding Photography are primarily photojournalists with hints of fashion and fine-art influenced wedding photography techniques. For more about our wedding photography style and philosophy, check out our About Us page.

If you are seeking photojournalism, make sure you read our section titled “What are Wedding Photojournalists” to ensure you are actually getting a photographer that specializes in this area.

How many weddings have you shot, and have you shot ones similar to mine?

This is a great question to get an idea of how much experience your photographer has in general. Years are not a good gauge of experience since some wedding photographers may work part time, and only shoot five weddings a year on weekends. Thus, maybe they have five years of experience, but they have only shot 25 weddings. Again, look at our experience gauge in the “How Do I Choose a Wedding Photographer.” section for a gauge on what we consider experienced.


How Many Times Have You Worked Specifically As A Wedding Photographer?

This question is designed to find out if the photographers are specialized in wedding photography or they are “one-stop-shop-photographers.” More specifically, you would be better off looking for a photographer that specializes, not only in wedding photography but the style of wedding photography.

How many other events will you photograph that weekend?

Larger studios with multiple master photographers (such as Lin and Jirsa Wedding Photography) will often double and even triple book dates since we have the resources. However, smaller studios may plan multiple weddings on a weekend without having the resources. Imagine a studio with a single wedding photographer shooting 2-3 weddings on a weekend, the attention to the detail, and to the client, the service could suffer in these circumstances.

Will a contract of the services be provided? If so, can I get a copy?

There are a lot of studios that don’t create contracts for their wedding photography clients. You should require a contract from your photographer that details what services they will be providing, pricing, termination resolution terms, etc. A contract is created for your protection, and for the wedding photographer’s protection. It is best to hire a photographer that will build a contract with you, and be wary of photographers that “don’t typically create contracts for clients.”

bookmark_borderWinter Home Electrical Safety Inspection

Electrical Home Safety Inspections

What You Need to Know About Electrical Home Safety Inspections

When was the last time your home had an electrical home safety inspection? Can’t remember? Not sure when you need to have one? According to the Electrical Safety Foundation, there are four major times when your home should be inspected by a licensed residential electrician

If you are purchasing a home (new or older)

If your home is more than 40 years old

If you are installing a new appliance (think washer, dryer, refrigerator, entertainment system, home office, etc.)

If your home is undergoing renovations

Apart from that, anytime you feel there are electrical problems in your home that could pose a safety hazard, you can always call us in for an electrical home safety inspection just to make sure. It is absolutely critical that these home electrical safety inspections be done by a licensed electrician because

electricians have years of experience solving common problems with residential electrical systems. Our first concern is maximizing the safety of your electrical system and preserving the level of safety it was engineered to provide.

Always have the electrical system assessed by a professional before purchasing a home. A professional electrician can accurately assess the strengths and weaknesses of your electrical system and provide a comprehensive plan to bring it up to optimum condition.

Most large electrical problems can be solved cheaply and easily if they are caught in the early stages. If you think you may have an electrical problem be sure to have it repaired immediately

An Electrical Home Safety Inspection: What We Look For

During an electrical home safety inspection, these are some of the important aspects of your home’s electrical system that we’ll examine

Electric Panels

This is the electrical nerve center of your home. Whether it’s in the garage, the basement, the utility room or somewhere outside, we will thoroughly examine the fuses and/or circuit breakers for proper connections, damage, age, rust, residue, smoke etc. We’ll check whether or not the panel is providing sufficient electrical capacity for your home’s needs too. We will also check whether or not your electrical panel is a brand that has been recalled or discontinued.


ELECTRICAL SAFETY INSPECTION

What is an Electrical Safety Inspection ?

An Electrical Safety Inspection is done by a licensed electrician to ensure that your home or office’s electrical system is up to code and that all electrical systems, including wires, electrical panels, and electrical components are working properly and hazard-free

To prevent fires and harmful accidents, it is important to make sure that all of your electrical systems meet legal safety and industry standards. Electric comes into your home or business to perform an electrical safety inspection, there are several key components we look for to give you a complete and accurate assessment of your entire existing electrical system

Once the thorough assessment has been completed, we can then provide you with information on what needs to be repaired or replaced to meet optimal standards.

Electrical Safety Inspection Benefits

Having the electrical system of your business or home inspected offers many critical safety benefits.

Electrical safety inspections:

Offer you with peace of mind knowing that your electrical systems, components, and appliances run efficiently and safely at all times.

Help to ensure that your electrical system meets all legal safety standards.

It can give you peace of mind about your overall safety and investment before purchasing a home.

Electrical inspections and corrections can actually help you reduce your annual electric bills and save on energy.

Having an inspection done can correct and greatly reduce the risk of fires and other electrical disasters.

Electrical inspections often find that certain components (like electrical panels) may be outdated or defective and need replacing before disasters occur.

Having an inspection done can also help to identify existing mistakes made by previous electricians and homeowners that may pose a threat to your home or building.

Inspections help to spot insufficient fuses and breakers before they start fires.

What We Inspect

We check to make sure that all electrical switches and outlets function properly.

We thoroughly check for shock/electrocution hazards so they can be eliminated.

GFCI protection where required

AFCI protection where required

Gas line bonding

Home electrical system grounding

Weather rated outdoor outlets

Breaker box inspection

Smoke detectors function and location

Loose or non-functional devices

Check for appropriate surge protection requirements.

When Do I Need an Electrical Safety Inspection?

Knowing when the right time to have an inspection done is a critical part of caring for your electrical system to ensure safety and efficiency. But how often should it be inspected, and are there certain instances where it definitely should be?

Before buying a home- Having an electrical inspection done before you purchase a home is a great way to prepare yourself to make educated decisions.

You have an older home- If your home or building is over 25 years old, it is a good idea to have an electrical inspection done due to equipment and key components becoming outdated or defective.

Renovation- If your home has undergone major renovations at any point in time, you should have your electrical system inspected to ensure all is in working order and installed properly.

DIY- DIY electrical work can be an absolute nightmare for your home’s safety, much less efficiency. If you know your home has gone through some questionable electrical work, you should have it inspected by a licensed electrician.

Old Wiring/Electrical work- If you can tell with the naked eye that your home’s electrical work may be outdated, get an inspection!

Noticeable Electrical Issues- If you have problems with lights flickering on and off in your home or the fuse blows when you turn on an appliance, it’s time to have an inspection done.

New Appliances- New appliances can strain your electrical system and cause many electrical issues if your home isn’t equipped for extra power usage.


Why & When To Get A Home Electrical Safety Inspection

Home safety is an important issue that not many homeowners think about, especially when it comes to the electrical system. electricians want everyone to have a safe and happy home so we want to help educate you on the importance of Electrical Safety Inspections, why you should get them, and when you should get them done.

How Often You Should Get An Electrical Safety Inspection

An annual electrical safety inspection will protect your home and family. The inspection should cover testing and visual inspection of every aspect of your home’s electrical system including the following.

Electrical Safety For Pool Owners

Water and electricity don’t mix, so safety around the pool is of paramount importance for any homeowner. Bad wiring and faulty pool lighting can threaten the life of your family and friends.

Electrical Safety Indoors

Main Service Panel – The main panel that houses the breakers will need to be upgraded about every 10 years for people who live in their homes and 5 for people who rent to a tenant. This panel supports the electrical load of the household, so for safety’s sake, find a residential electrician who is qualified to inspect it and upgrade it for you.

GFCI Outlets – Ground Fault Circuit Interrupters are a type of outlet that cuts off power to the outlet when it senses water. Your electrician can install those for you if your home is not up to code or if you feel you would like them throughout the house for safety.

Loose Wiring – Faulty wiring is the number one cause of house fires, so make sure you get an electrical safety inspection which covers wiring, GFCI outlets, the service panel, and everything else.


Whole House Safety Inspection

With electrical wires running through the walls and ceilings of your home, you might not be aware of an issue before it causes larger problems in your house. To ensure there aren’t problems with your wiring and your home is as safe as possible, schedule an electrical safety inspection with an experienced electrician

What Electricians Check During a Whole House Safety Inspection?

Issues with your home’s wiring system can pose hidden dangers to your family. To protect your entire household, it’s important to schedule a whole house safety inspection.

During these appointments, you can expect an electrician to perform the following tasks:

Check the light bulbs to ensure the wattage is correct.

Examine the outlets to check their condition and prevent electrocution risks.

Inspect smoke and carbon monoxide detectors to ensure they’re fully functioning.

Ensure surge protectors are fully functioning.

Check outdoor lighting and electrical components to make sure they work as expected.

Benefits of Whole House Safety Inspections

Having a whole house safety inspection performed can offer many benefits for your family. While you might think your wiring and circuit breakers are functioning properly, there could be problems you can’t see that can cause larger issues later.

Some of the advantages of having an electrician perform a whole house electrical inspection can include:

Making sure electrical components are working properly and are up-to-date.

Finding and identifying outdated or damaged wiring.

Identifying potential fire hazards.

Looking for potential issues in a new home.

Finding ways to save energy and electrical costs.


Reasons Why You May Need A Home Electrical Inspection

You are asking “Is my wiring safe?”  When purchasing a century house, When purchasing a resale home, Before starting a Major Renovation Your insurance company is asking  “Is your wiring safe?”  Home Electrical Inspection for Insurance Purposes.

When Purchasing a Century Home

Electrical wiring whole house electrical inspection is important when purchasing a century home. It is sure that the original wiring cannot withstand the demand of modern living. Also, you should seriously question the number, and quality, of attempts to improve on the original wiring.

When Purchasing a Resale Home

A whole house electrical inspection is an excellent place to start when buying a resale home. Even though a house may have been meticulously wired when first built, unlicensed and unqualified work is often done as owners renovate, add equipment and build-on. The older the house, the bigger the risk that not only is the house not up to today’s standards.

Before Starting a Major Renovation

If you are adding to your existing wiring, an electrical inspection at the beginning will inform you if your existing system can support your renovation plans, If not, electrical upgrades can be addressed most cost-effective as part of the renovation process.

Home Electrical Inspection for Insurance

Occasionally your insurance provider may ask for a home safety electrical inspection. This may happen when you are switch insurance provider. It can also can happen when you have been with the same insurance company for a number of years, often after a claim

bookmark_borderWhy One Should Need A Car Accident Lawyer

When Should I Get An Attorney for a Car Accident

After an accident, car accident victims are often left to deal with serious injuries and rising medical bills on their own. Insurance companies often offer accident victims a low-ball settlement that is just a fraction of what they need to recover. These insurance companies don’t have your best interest in mind—the only people they have in mind are their shareholders and reducing their liabilities. They may pressure accident victims into signing a settlement too quickly and you could end up with less than you need to cover your injuries.

The moment your accident occurred, a clock started ticking. It’s a countdown to the first financial hit coming your way as a result of your injuries. For most folks, that first hit is a missed paycheck. Then the first medical bill comes in, and there won’t be just one. Pretty soon, you find yourself with a financial problem that you don’t know how to solve.

That’s why it’s important that you call one of our experienced car accident attorneys as soon as possible following your accident. This ensures that our team can collect important evidence and witness accounts that could be lost over time. It also allows our legal team to go to work quickly to build a strong case for you. The sooner you call, the sooner you can get the compensation you deserve for your accident.

Steps to Take After a Car Accident

Immediately after you are injured in a car accident, there are steps you can take to help you collect the compensation you need.

  • Call 911 – Call 911 and report your accident, which helps alert both police officials and emergency medical teams to the scene of the accident. Your police report and your medical report will be invaluable when establishing fault and liability. Without them, it’s just your word against theirs.
  • Gather Evidence – Gathering evidence can be done easily now that we have smartphones. Snap pictures of license plates, eyewitness information, vehicle damage, traffic patterns, intersections, and any other important information that could help your lawyer establish fault.
  • Contact a Lawyer – Insurance companies will always seek to reduce their liabilities by offering accident victims a low-ball settlement offer. This is usually a fraction of what you need to recover. Contact an experienced car accident attorney immediately to begin building your case. Remember, contacting an attorney is not the same thing as filing a lawsuit.


You should hire an attorney to represent you after a car accident in these situations:

  • You suffered injuries and/or significant damage to your car. If you were involved in a minor fender-bender that did not cause serious injuries, you may not need the assistance of a car accident injury attorney. But in all other circumstances, speaking with an experienced car accident injury attorney is the best way to protect your legal rights to recover compensation.
  • It is obvious, or even just possible, that someone else’s actions contributed to causing the accident. Speak with an attorney about any car accident in which someone else’s actions may have played a role, including any accident involving more than one vehicle, and any accident involving a sudden, unexpected loss of control of your car.
  • You’ve been offered a low-ball settlement by the other driver’s insurance carrier. It is important to speak to an attorney before ever agreeing to a settlement or making an official statement to a third-party insurance provider. Early after an accident, it is difficult, if not impossible, for you to have a clear and thorough understanding of the costs accident injuries might inflict on your life. Until an experienced attorney has helped you analyze the extent of the damages you have sustained, you risk accepting a settlement in your case that is much too low and will not fully cover the expenses you face now and in the future. Once you’ve accepted a settlement, you generally will not have the opportunity to go back and ask for more money.
  • Your injuries are severe and permanent. Permanent injuries inflict a lifetime of expenses, including future surgeries, hospitalizations for complications, modifications to your home, and a decline in your earning capacity. Let an attorney help you obtain the money you need to pay for them.
  • Your accident was caused by the negligence of a governmental agency. It takes skill and know-how to recover compensation from a local or state government entity as damages for the wrongful actions of its employees. Ask an experienced attorney who understands the complications of taking legal action against a government entity to help you.


The insurance company isn’t on your side like you think they are.

While we like to think that insurance companies have our best interests in mind, their first aim is to keep their own costs down and reduce overhead. This means that your interests and those of insurance companies may not always align. Hiring an attorney is one way to ensure that you have an advocate on your side to protect your rights.

Proving liability can be difficult.

Determining the party that was responsible for the accident can be hard. You will also have to prove that they breached the duty of care and that their breach resulted in your injuries. Hiring an experienced personal injury attorney who understands the law will increase your chances of being able to prove the necessary things in order to win your case.


What Compensation Can I Collect?

After an accident, there’s so much to be done – and much of it is costly. If you hire an attorney, they will fight for you to win the maximum amount of compensation possible. For instance, these expenses could be covered:

  • Car repairs
  • Doctor visits
  • Hospitalization
  • Rehabilitation programs
  • Future medical costs

On top of that, you may be compensated for the time you missed from work, your pain and suffering, punitive damages, or any reduced earning capacity you may have suffered. Without a lawyer, it is much more difficult to win compensation for all you are owed. That is why we suggest that you make sure you have award-winning legal representation on your side.


Knowledge of Law and Procedural Rules

Hiring a personal injury attorney to represent you after a car accident means you will have a professional working for you — one who is extremely knowledgeable about the relevant laws and procedural rules that may affect your case.

An attorney can advise you of any time limits (called statutes of limitations) that can bar you from filing a lawsuit against the at-fault driver. For instance, in many states you must file your lawsuit within two years of your car accident or be forever prohibited from filing your lawsuit. An attorney will also be able to inform you about any special exceptions to the statute of limitations — for minors, for example.

Your attorney can file a lawsuit on your behalf and will know how best to mitigate any possible defenses raised by the other side. In addition, once your case gets under way, your lawyer will play an invaluable role in preparing your case for trial — and even going to trial if your case doesn’t settle.

Even though a lawsuit is rarely necessary, the threat of legal action offers strong leverage when negotiating a fair settlement.

Finally, and perhaps most importantly, having an attorney who is knowledgeable about the law evens the playing field, especially when you are going up against the experience and vast resources of a large insurance company.

bookmark_borderUses And Tips On How To Use It Water Testing

BOTTLED WATER GUIDE

How Often Do I Need to Sample?

Weekly – you must collect samples of each type of finished bottled water for fecal coliforms or E. coli testing.

Quarterly – you must randomly collect samples for aerobic plate count analysis of at least four containers and four closures. The containers and closures are sampled by either using a swab of the container and cap, or a rinse of the container before filling or sealing the bottle.

How Do I Submit a Water Sample?

Check with the laboratory that you will be working with for direction regarding the type of sample containers to use and how much water will need to be collected. For more information please see the Guidance for Quarterly Bottled Water Container and Closure Requirements.

What Are the Levels At Which My Samples Would Not Meet the Requirements?

Weekly samples must be free of coliforms.

Quarterly samples must be free of coliforms, and no more than one of the four samples may exceed:

one bacteria per milliliter of capacity (preferred and easiest method); or

one colony per square centimeter of surface area.

What Should I Do If I Get an Unacceptable Result?

If the results of weekly sampling are positive for coliforms you must:

immediately notify the department

submit additional samples from the same lot as the initial positive sample (or the next available lot if initial lot if not possible) for analysis within 24 hours or next business day of receiving notice that the initial sample was positive;

detain the product pending the results of the additional samples;

notify the department of results of the additional samples; and

keep a record of any actions taken.

If the results for quarterly bottle and closure samples exceed limits you must:

review your transportation, storage, and bottling procedures to find the source of the contamination;

immediately correct any deficiencies found; and

keep a record of your review.


Specialty Testing Packages

Problem Check- An informational testing package developed for people experiencing problems with iron and/or other aesthetic problems such as odor, taste or discoloration. This package can be used for well water and city water.

Corrosion Check – An informational testing package that was developed for people who are experiencing signs of corrosion in their plumbing fixtures.  This test analyzes contaminants that can specifically affect corrosion.  This package can be used for well water and city water.

Waterborne Pathogen Panel- This test focuses on pathogens in water systems that can cause illness. Several of these organisms are indicators of sewage contamination, making this a good test for anyone who suspects their water has been contaminated by sewage or animals waste.

Complete RO Screen- The Complete RO Screen was developed to be the most complete analysis available for reverse osmosis design. The Complete RO Screen offers a comprehensive, in-depth analysis of parameters necessary to determine the proper reverse osmosis system specification.

quick series testing provides water analysis in as quick as 2-3 business days from receipt of the water sample. These tests are an excellent tool for home inspectors or realtors involved with home sales. When time is critical, these tests can provide quick answers to very important questions about water quality in the home.


Beginner’s Guide to Pool Water Testing

have all heard of “testing the waters” but when comes to swimming pool maintenance, water testing is the best route to an easy to maintain pool. You have to do more than touch the water to test anything more than the temperature. Test kits, strips and readers are used to check pool water balance levels.

Why Test Pool Water?

A swimming pool is just a hole in the ground without water, and swimming is no fun if not experienced in clean, clear and healthy water. Since swimming pools are generally used by multiple people at any given time, it is imperative that pool water is tested and treated regularly to prevent the spread of infectious illness and enhance the pool experience.

What Water Tests are Needed?

In order for us to have a sparkling clean and well-balanced pool, we have to ensure that the levels of pool chemicals stay within the ideal range of:

pH: 7.2 – 7.6

Alkalinity: 80 – 120 ppm

Calcium Hardness: 180 – 220 ppm

Chlorine: 1-3 ppm

Bromine: 3-5 ppm

Cyanuric Acid: 30 – 50 ppm

How Often Should I Test Pool Water?

It is recommended to test your pool water at least weekly and add chemicals if you see an increase/decrease in ideal chemical levels. More precisely however, pH and chlorine levels should be tested more often, perhaps daily until you come to a good understanding of how they fluctuate.Other readings, for calcium, alkalinity and cyanuric acid, tend to move more slowly and can be tested weekly or even monthly in some cases.

How Do I Test Pool Water?

There are several types of testing supplies available on the market varying in price and accuracy. Since I work for a company that sells pool supplies, it was fairly easy for me to get customer input via our amazing review program, and I was able to narrow down the bestselling water testing supplies to make it easier for you to make the selection to your liking.


Flushing and sampling for lead

Children up to six years old are more sensitive to the effects of lead because they are still developing and their small bodies can absorb it more easily than adults. Even small amounts of lead can be harmful to young children, infants and pregnant women.

The law

By law, if you own or operate a school, private school or child care centre, you must:

flush your plumbing regularly

sample your water to test for lead

The regulation requires the flushing of plumbing in schools, private schools and child care centres. Flushing has been shown to reduce lead levels in water at drinking water fixtures. The regulation also requires sampling and testing to measure the concentration of lead in drinking water against the provincial drinking water quality standard for lead.

In this guide, you will see the term “drinking water fixture”. For the purposes of this guide, this term means all drinking water fountains and every tap that provides drinking water or is used to prepare food or drink for children under the age of 18.

Remember, this guide is only a summary, and should not be relied upon for compliance purposes. You must refer to the text of O. Reg. 243/07 to be clear about your specific requirements for flushing, sampling and testing drinking water for lead


WATER TESTING GUIDE

What is in your dental unit waterlines? You’ve probably seen the pictures and you’ve probably read the news headlines – looking for the answer to this question is not without stress.

While dental waterline contamination has gotten more attention the last couple years, this is a danger that the dental industry has struggled to understand or control. In fact, at the Organization for Safety, Asepsis, and Prevention’s (OSAP) Annual Conference last year,

The tough part about maintaining dental waterlines – and infection control, in general – is that, dental professionals are not and should not be experts in waterline science. We, your patients, sit in your chairs every few months trusting you to be fantastically educated and skilled medical professionals, not water scientists.

WHY TEST YOUR DENTAL UNIT WATERLINES?

Because on average even treated waterlines fail testing nearly 1/3 of the time. And non-treated lines are likely to have counts 200 to 400 times the CDC guidelines of ≤ 500 CFU/mL. ProEdge completed a study of over 22,000 consecutive waterline tests from our water test clients measuring the effectiveness of all major products in real-world settings

While using a high-level disinfectant to “shock” your waterlines and adding a low-level antimicrobial treatment to continually maintain them are both necessary for every effective treatment protocol, no treatment product is perfect, instructions for use (IFUs) can be difficult to follow, and biofilm never quits entering the lines to multiply and spread.

bookmark_borderTax Planning For Your Corporation

What is strategic tax planning?

Tax Planning Defined

You have a business venture and it is making money. Your accountant projects your income and the corresponding tax that you will have to pay. You are hesitant to shell out cash to pay your tax liability. So, you schedule a tax consultation with your accountant. The accountant can make suggestions on ways to legally reduce your expected tax liability. That is called tax planning.

Tax planning is commonly defined as the manner of forecasting your tax liability and creating circumstances and ways to reduce it. Tax planning involves the analysis of your financial situation from a tax perspective with the end view of tax efficiency. However, tax planning should not be confused with tax avoidance as the latter includes ways to use tax laws that are not intended by Congress. On the other hand, when you use tax laws to reduce your tax payable in a legal manner that abides by the tax laws, it is referred to as tax planning.

Steps for Tax Planning

  1. Start Early

Most people do their taxes in March or April when the deadline for filing tax returns is approaching. If you don’t start making decisions that can reduce your tax bill until after December 31 or the year-end, you will be stuck with your current tax liability. Thus, it is highly encouraged that tax planning should start early to give you more time to make a good estimate of your investment gains or losses and income. The earlier you can get this information the more time you have to do something about it.

For example, you have an expected gain from an investment. This gain will put your total income within a higher tax bracket than the previous year, resulting in a higher tax. But, given that you have determined an estimate of your total income, you are able to plan out some deductions to put your income back into a lower threshold.

  1. Assess Tax Liability

Tax liability is the amount of tax payable based on current and applicable tax laws. An event or transaction that results in a tax consequence triggers the calculation of the tax liability. The calculation is done by multiplying the applicable tax rate on your determined tax base. The tax base could either be your income or asset balance during the period. The resulting product will be your taxable amount for the tax period. Having a certain estimate of your tax payable is helpful for working toward a plan that results in savings. The amount of tax liability computed previously will allow you to determine how much to invest to save on tax.

  1. Profile Risk Level

Since tax planning includes investment mechanisms designed to reduce your tax liability, it is important that you do risk profiling. It is a process of finding an optimal level of investment risk that your current financial situation and other personal circumstances may permit.

To come up with a risk profile, you need to consider the following:

  1. Risk Required: the risk associated with the return you want to achieve
  2. Risk Capacity: the level of risk that you can afford to take
  3. Risk Tolerance: the risk level that you are comfortable with

These characteristics must be assessed separately and compared to one another to come up with a trade-off decision to achieve optimum results.


Understanding Your Tax Basics

No matter what the season or your unique circumstances, when it comes to your taxes, planning usually pays off in a lower tax bill. The following is provided so that you may have a basic understanding of taxes before you discuss filing options and strategies.

Filing Status – Except for a surviving spouse, or married individuals who have lived apart for the entire year, your filing status depends on your marital status at the end of the tax year. Generally, if you are married at the end of the tax year, you have three possible filing status options: Married Filing Jointly, Married Filing Separate, or if you qualify, Head of Household. If you were unmarried at the end of the year, you would file as Single status, unless you qualify for the more beneficial Head of Household status.

Head of Household is the most complicated filing status to qualify for and is frequently overlooked as well as incorrectly claimed. Generally, the taxpayer must be unmarried AND:

  • Pay more than one half of the cost of maintaining as his or her home a household which is the principal place of abode for more than one half the year of a qualifying child, or an individual (relative) for whom the taxpayer may claim a dependency exemption, or
  • Pay more than half the cost of maintaining a separate household that was the main home for a dependent parent for the entire year.

A married taxpayer may be considered unmarried for the purpose of qualifying for the Head of Household status if the spouses were separated for at least the last six months of the year, provided the taxpayer maintained a home for a dependent child for over half the year.

Surviving Spouse (also referred to as Qualifying Widow or Widower) is a rarely used status for a taxpayer whose spouse died in one of the prior two years and who has a dependent child at home. The joint tax rates are used, but no exemption is claimed for the deceased spouse. In the year the spouse passed away, the surviving spouse would file jointly with the deceased spouse if not remarried by the end of the year.

Adjusted Gross Income (AGI) – AGI is the acronym for Adjusted Gross Income. AGI is generally the sum of a taxpayer’s income less specific subtractions called adjustments (but before the standard or itemized deductions and exemptions). Many tax benefits and allowances, such as credits, certain adjustments and some deductions are limited by a taxpayer’s AGI.

Taxable Income – Taxable income is your AGI less deductions (either standard or itemized) and your exemptions. Your taxable income is what your regular tax is based upon using either the IRS tax tables or the tax rate schedule.

Marginal Tax Rate – Not all of your income is taxed at the same rate. The amount equal to the sum of your deductions and exemptions is not taxed at all. The next increment is taxed at 10%, then 15%, etc., until you reach the maximum tax rate. When you hear people discussing tax bracket, they are referring to the marginal tax rate. Knowing your marginal rate is important, because any increase or decrease in your taxable income will affect your tax at the marginal rate. For example, suppose your marginal rate is 25% and you are able to reduce your income $1,000 by contributing to a deductible retirement plan. You would save $250 in Federal tax ($1,000 x 25%). Your marginal tax bracket depends upon your filing status and taxable income. Find your marginal tax rate using the table below.


What is the strategic tax planning process?

Every business has a story and it’s important for a strategic tax planning professional to understand a business’s situation and goals. That unique narrative informs the professional on how to structure the tax advisement.

Below is what can be expected during the strategic tax planning process:

  • Basic information about the business is gathered to determine project feasibility. It includes the recent income statement and balance sheet; first five pages of the most recent corporate tax return and personal tax return for the owners; current fiscal year projections; and ownership structure.
  • Once the engagement commences, more detailed information is analyzed. It includes 3 years of corporate and personal tax returns; 3 years of business financial statements; estate planning documents such as wills, trust etc.; an employee census; any buy / sell agreements or other succession plans currently in place between the owners; tax returns of any affiliated entities; personal financial statements for each owner; real property depreciation schedule, etc.
  • Strategy is developed. After all the information has been analyzed, the strategy is developed, and several reports are created which detail the strategy and recommendation.
  • The comprehensive report is presented. The strategic tax planning professionals present the reports that detail the strategies, all of which are supported by law. The professionals will then work with the business to ensure proper implementation of the strategies.

The strategic tax planning process and strategy development provide a holistic approach to look forward to determine how a business can enhance its tax efficiency. Is strategic tax planning a process that’s right for your business?


Strategic vs. Tactical Tax Planning

If you search online for “tax planning” advice, you get a lot of information on the tactical management of tax benefits and tax obligations. Hundreds of “Tax Planners” and postings about tax planning pop up like mushrooms in the forest after a rain. The majority of them have one focus: Tactical Tax Planning. Most of them are too simplistic to capture the wide range of issues involved in tax planning matters that demand strategic thinking.

Tactical tax planning focuses on the hear-and-now, and usually deals with annual tax juggling issues. It involves questions like:

  • What everyday expenses are deductible?
  • Which method should you use to track and deduct car expenses?
  • For what did you use the funds taken from your home equity line of credit?
  • Do you need to make estimated tax payments?
  • For which tax credits do you currently qualify?
  • Will your adjusted gross income trigger the Alternative Minimum Tax?

Strategic tax planning, however, takes a longer view of your financial situation, and is not bound by the constraints of annual tax return filing deadlines. As an example, it focuses on how to structure capital assets to maximize the gain on sale by minimizing the capital gains tax due. This sale may not occur for years, but questions must still be answered to maximize tax benefits:

  • How can my property portfolio complement each other to minimize my capital gains tax bill when one or more of the properties is sold?
  • What is my business worth? Do I have an exit strategy in place when I decide to sell the business and to whom I might sell it?
  • How do I plan to pay the taxes due?
  • What are the decisions that need to be made in the years before I exit my business that would maximize return and minimize taxes due?
  • What is the difference between “loan proceeds” and “sales proceeds,” and why must I understand the difference?
  • How do I take advantage of “timing” when accepting the proceeds of an asset sale?


6 Key Elements of an Effective Tax Management Plan

Following are the key elements to include in your tax plan that can help you work toward the largest possible tax savings.

  • Assemble Your Team: It’s important to have an advisor knowledgeable in tax law and current tax-law changes who is also a proactive tax planner. If your CPA is also a strategic tax planner, he or she is a great fit. If not, a CERTIFIED FINANCIAL PLANNERTM is the perfect advisor to bring on board.
  • Review Last Year’s Return Line by Line: Once your tax advisor wraps last year’s returns, it’s time to get to work with your tax-planning team. Your advisor should conduct a line-by-line review of your latest tax returns to identify every savings opportunity available. This is especially important this year. Even if your income and expenses remained the same from 2017 to 2018, with all the tax law changes, your returns could show significant changes in your tax bill.
  • Business Owners: If you’re a business owner, your advisor needs to thoroughly review both your personal and your business returns from last year.
  • Create a Holistic Tax Plan: With inefficiencies highlighted, it’s time to make a plan. An effective tax plan should encompass every area of your financial life. It will bridge your investments, income, business structures, retirement plan, charitable giving, estate plan, and more. Whether you’re working with a CPA or CFP®, they should pull in everything, no matter how simple or complex your situation.
  • Create or Update Your Plan Between April and September: Aim to complete your plan before the end of September. This will help you maximize your savings by implementing any changes during the year rather than playing catchup in November/December.
  • Coordinate Tax Planning with All of Your Advisors: Most of us take full advantage of the tax deductions we know about. The problem often lies in the gaps between our tax, financial, and legal work. Without a coordinated team of advisors, you could unknowingly make financial or legal decisions that create a negative tax burden. A good CFP® will be that main point of contact who acts as your head coach and coordinates the whole team.

bookmark_borderChoosing Residential Cleaning Services

How Much Does It Cost to Hire a House Cleaning Service?

With many people leading busier lives than ever before, finding time for traditional chores like house cleaning can be a challenge. Fortunately, there are plenty of professional house cleaners who will be happy to come into your home and take care of the cleaning for you. They handle everything from vacuuming the rooms and doing laundry to washing the windows.

House cleaning costs vary depending on numerous factors like the home size and the level of cleaning required. The national average is between $150 and $250 for this service, with most homeowners paying $219 for a standard one-time clean of a 2,000-square-foot home.

House Cleaning Cost Calculator

The cost to clean a house is determined by several factors. The first is whether it’s a one-time cleaning, or set up on a recurring plan where you can expect a volume discount. House cleaning prices are often estimated on a square-foot basis, although certain types of rooms may cost more than others. Some cleaning services also provide extra levels of detail, such as organizing or touching up appliances, and may cost more. If you’d like an estimate for house cleaning, try our house cleaning cost calculator.

House Cleaning Cost by Type of Service

House cleaning can be divided into two main types – one-time cleaning and recurring cleaning. One-time cleans are one-off sessions where a house cleaner comes into your home, carries out the necessary cleaning tasks, and then leaves. A recurring clean is when you arrange with a cleaner or cleaning company to come back on a weekly, biweekly, or monthly basis. You usually receive a discount if you opt for a recurring service because there is generally less work to do each time.

One-time Cleaning

One-time cleaning is usually more expensive than recurring cleaning because there is often more work for the cleaners to do. Also, they will be less familiar with your home’s layout and your needs. The table below shows average prices for different types of one-time cleaning.


How to Clean a House Professionally Checklist

Those who professionally clean homes provide a valuable service to people who do not have the time or skills to clean their home. Since professional cleaners have far stricter standards for cleaning, they need to remember certain cleaning tasks that the average homeowner might not even consider

A residential cleaning checklist typically involves more detailed work than cleaning in a commercial environment. Cleaners need to make sure that each part of the house is thoroughly cleaned from top to bottom. Before getting started on a residential cleaning checklist, professionals need to make sure they have a full complement of cleaners, rags, mops, vacuums, cleaning buckets, and scrubbing pads. This how to clean a house professionally checklist outlines all the basic tasks that a professional will need to complete.

  • Dust all surfaces, including all furniture, appliances, baseboards, chair rails, blinds, window frames, fans, stair railings, pictures, mirrors, and light fixtures.
  • Spot clean switches, outlet covers, cabinet fronts, and doors.
  • Vacuum any carpets or rugs.
  • Sweep or vacuum hard floor surfaces and damp mop them.
  • Empty all trash containers.
  • Remove any buildup and clean toilets on the inside and out.
  • Clean and disinfect all countertops, showers, sinks, and tubs in the bathrooms..
  • Clean and disinfect kitchen counters, sinks, range hoods, tables, microwave interiors, and appliance exteriors.
  • Clean and shine mirrors, glass doors, and other glossy surfaces.
  • Do brief, basic tidying upon request.
  • Change sheets and make beds upon request.

Summer Cleaning Tips

In the summer time, there may be a few extra things to do in addition to following your basic house cleaning chart. Extra cleaning occurs because the heat and moisture of summer can cause additional grime to build up, so it is helpful to know some summer cleaning tips. Pay special attention to the floors, since many homes will have people tracking in pool water, mud, or dust. If mud is tracked into the home, brush away dry mud with a stiff brush before gently sponging the remaining stain. Many customers prefer light citrus scents during the hot months, so you can switch cleaners just to change it up a little. Some will be interested in paying extra for cleaning outdoor areas, so we will discuss cleaning deck furniture with clients during our quote process.

Christmas Cleaning Checklist

It is normally a good idea to deep clean the house at least a few times each year, and Christmas is an excellent time to do some extra cleaning the home. Your how to keep a clean house schedule will change a little when you get ready for Christmas cleaning. Follow this checklist to make the house is sparkling clean and full of Christmas cheer for all holiday guests.


How to Create a Cleaning Schedule That Works For You

It is one of those things that we all need to do, but never really want to do. In fact, over the years I have received more reader questions about cleaning, organizing, and decluttering than I could count. It seems that we all want to have a neat and orderly home, but not all of us know exactly how to get there, and certainly not as fast as we’d like to.

Because let’s face it–life is busy, and none of us want to spend all our time cleaning. Even while every single person is home right now because of the COVID-19 pandemic, I’m sure it feels like there’s even more to clean, but you still shouldn’t have to spend all your time doing so. So let’s figure out how to tackle it with a plan.

How to Create a Cleaning Schedule That Works For You

First, for those of you who are unsure of what a cleaning schedule is, let me break it down for you. A cleaning schedule is basically just a daily, weekly, or monthly plan for how you will clean your house.  It can be as simple as one main task per day or as complex as a spreadsheet that accounts for every single housekeeping task that needs to be done over the course of a year.

If the idea of creating any sort of cleaning schedule sounds overwhelming, try not to worry—I promise it is not as bad as it sounds. In fact, as you will see below, you can do it in three easy steps! The point of a schedule is not to make you feel guilty or to make you have more to do, but to actually relieve guilt and to create a routine that gives you more freedom and less stress. Knowing that you have a workable, manageable plan to tackle those sticky sinks and dusty dressers makes the idea of cleaning house seem a lot less overwhelming in the long run.

Create a Master Task List

Before you can decide when to clean you must first know what to clean, and how often. Thus before you can create a cleaning schedule that works for your life and your schedule, you need to assess your own home and cleaning needs. A cleaning schedule for a childless couple living in a 1-bedroom apartment will look very different from a cleaning schedule for a homeschooling mom of five living in a 4-bedroom house!

Pick the Best Plan for YOU (Choose ONE)

The next thing you need to do is figure out what sort of cleaning plan will work best for your life and your schedule. Are you the kind of person who wants to do a little every day, or would you rather tackle it all at once so that you don’t have to think about it for the rest of the week? Do you work full time or are you home during the day? Do you have young children at home or are your kids old enough to help shoulder some of the responsibility?


Building Cleaning and Maintenance Industry Guide

Defining Cleaning and Maintenance

Sales tax applies to building cleaning and maintenance, disinfecting, and exterminating services. However, sales tax does not apply to building repair services.

Buildings and Structures

A building or structure includes the building or structure itself and all improvements or fixtures annexed to the structure that are both:

Integrated with and of permanent benefit to the building or structure

Cannot be removed without substantial damage to itself or the building or structure

Sales – Building Cleaning and Maintenance

Building cleaning and maintenance, disinfecting, and exterminating services are taxable. Building cleaning and maintenance includes both interior and exterior cleaning of commercial and residential buildings, homes, and apartments to keep them in good upkeep or condition. It does not include repairs to buildings.

Taxable Services

Carpet cleaning

Ceiling tile cleaning

Chimney cleaning

Disinfecting, exterminating, and pest control

Duct cleaning

Elevator cab cleaning

Floor cleaning, vacuuming, and waxing

Furnace cleaning

Gutter cleaning

Janitorial services

Junk removal services

Lighting maintenance

Office cleaning

Parking ramp cleaning

Pressure washing a building

Restroom cleaning, deodorizing, and sanitizing

Smoke odor counteracting

Swimming pool, spa, and hot tub cleaning, maintenance, and disinfecting

Swimming pool, spa, and hot tub opening and closing services

Venetian blind cleaning

Ventilation system cleaning

Window washing

Wall and woodwork cleaning

Water removal (flood or fire damage)

Nontaxable Services (if separately stated on the invoice)

Cleaning underground tanks

Insulation removal

Maintenance of outdoor parking lots and outdoor mall areas

Painting and wallpapering

Repairs to real property

Repairs to mechanical systems

Sandblasting exteriors of buildings

Septic tank pumping

Services performed by employees for an employer

Services provided by one business entity for another when one of the entities owns at least 80% of the other

Sewer and drain cleaning

Snowplowing and removal

Washing dishes, dusting knick-knacks, making beds, picking up, and room straightening


The Ultimate Cleaning Checklist

This cleaning checklist includes all of the essential chores to tackle, according to the pros. Follow the house cleaning schedule loosely or to a T—either way, you’ll be pleased with the progress and you’ll enjoy a cleaner home every day.

Daily

Make your bed

Wipe down bathroom counters after getting washed up morning and night

Empty/load dishwasher

Take out trash

Do a nighttime sweep to put toys, loose papers, and other stray objects in their place

Wipe down counters, table, and sink

Weekly

Dust all hard surfaces

Vacuum and/or mop floors

Wipe down appliances

Wipe down and disinfect countertops

Wipe down mirrors

Scrub and disinfect the kitchen sink

Scrub and disinfect toilets

Clean and scrub showers and tubs

Change and launder sheets and towels

Toss any food that has expired

Monthly

Vacuum upholstery

Wipe out and disinfect wastebaskets

Wipe down and disinfect doorknobs, light switches, and TV remotes

Dust ceiling fans and vents

Dust moldings

Scrub stovetop, including burner grates

Wipe down kitchen cabinets

Clean and deodorize the microwave (heat a mug of water with a lemon wedge, then wipe down)

Every Three to Six Months

Launder or hand-wash curtains

Vacuum mattress (every three months) and flip or rotate 180 degrees (every six months)

Clean and condition leather and wood furniture

Clean blinds

Vacuum drapes and fabric shades

Dust lampshades

Wipe down baseboards

Shake out rugs

Scrub grout

Wash windows inside and out

Clean and degrease the stove hood

Polish stainless steel appliances

Clean refrigerator and freezer interiors

Clean and descale coffee maker

Every Six to 12 Months

Clean oven interior

Wash or dry clean slipcovers

Wash or dry clean pillows

Wash or dry clean comforters

Empty and clean cabinet and pantry shelves

Vacuum or dust refrigerator condenser coil

Wash and dry stove hood filter

Every Year or So

Have rugs professionally cleaned

Pull out large appliances and furniture to clean behind and underneath

Wipe down walls

Wash window screens

Clean dryer duct

Have upholstery and drapes professionally cleaned (every two years)

Have gutters professionally cleaned.

bookmark_borderHypnosis For Pain Management

What are some pain management techniques?

Pain comes in two basic forms chronic and acute. In most cases acute pain is a result of a sudden event like surgery, bone fractures, infections, cuts and lacerations, falls, and burns. Acute pain is normally treated by a physician immediately following the event that caused the pain. Usually the pain does not last very long, six months at the longest and it dissipates as the injury or condition heals. Chronic pain is long lasting and is the result of a disease or condition. Some chronic pain may be the result of trauma which caused a longer term issue. In many cases the pain starts to affect the patient in unexpected ways like a loss of appetite, depression, and a decrease in energy. When a patient begins to experience chronic pain it is time to see a pain management doctor.

Common Chronic Pain Symptoms

Some common chronic pain symptoms and complaints include:

  • Spine and back pain
  • Headaches
  • Arthritis and osteoarthritis
  • Fibromyalgia
  • Damage to nerves
  • Cancer and cancer treatments
  • Joint damage and inflammation
  • Psychological


Causes of Chronic Pain

While some chronic pain is the result of disease, injury, or other medical conditions, some are caused by less troublesome issues. Some issues that may be more easily treated through lifestyle changes include:

  • An uncomfortable or bad mattress
  • Bad posture
  • Repetitive motion conditions
  • Improper shoes
  • Excessive weight
  • Poor lifting techniques
  • Diet & Nutrition


Non-invasive pain relief techniques that really work

Sometimes pain has a purpose — it can alert us that we’ve sprained an ankle, for example. But for many people, pain can linger for weeks or even months, causing needless suffering and interfering with quality of life.

If your pain has overstayed its welcome, you should know that you have more treatment options today than ever before. Here, we’ve listed eight techniques to control and reduce your pain that don’t require an invasive procedure — or even taking a pill.

Cold and heat.

These two tried-and-true methods are still the cornerstone of relieving pain for certain kinds of injuries. If a homemade hot or cold pack doesn’t do the trick, try asking a physical therapist or chiropractor for their versions of these treatments, which can penetrate deeper into the muscle and tissue.

Exercise.

Physical activity plays a crucial role in interrupting the “vicious cycle” of pain and reduced mobility found in some chronic conditions such as arthritis and fibromyalgia. Try gentle aerobic activities such as walking, swimming, or cycling.

Physical therapy and occupational therapy.

These two specialties can be among your staunchest allies in the fight against pain. Physical therapists guide you through a series of exercises designed to preserve or improve your strength and mobility. Occupational therapists help you learn to perform a range of daily activities in a way that doesn’t aggravate your pain.

Mind-body techniques.

These techniques, which include meditation, mindfulness, and breathing exercises (among many others), help you restore a sense of control over your body and turn down the “fight or flight” response, which can worsen chronic muscle tension and pain.

Yoga and tai chi.

These two exercise practices incorporate breath control, meditation, and gentle movements to stretch and strengthen muscles. Many studies have shown that they can help people manage pain caused by a host of conditions, from headaches to arthritis to lingering injuries.


Manual techniques

Manipulation of affected areas by applying force to the joints, muscles, and ligaments. Some evidence for the effectiveness of certain techniques is available.

Behavioral modification

Use of behavioral methods to optimize patient responses to back pain and painful stimuli. Cognitive therapy involves teaching the patient to alleviate back pain by means of relaxation techniques, coping techniques and other methods. Biofeedback involves learning to control muscle tension, blood pressure, and heart rate for symptomatic improvement.


Biofeedback.

This technique involves learning relaxation and breathing exercises with the help of a biofeedback machine, which turns data on physiological functions (such as heart rate and blood pressure) into visual cues such as a graph, a blinking light, or even an animation. Watching and modifying the visualizations gives you a degree of control over your body’s response to pain.

Music therapy.

Studies have shown that music can help relieve pain during and after surgery and childbirth. Classical music has proven to work especially well, but there’s no harm in trying your favorite genre — listening to any kind of music can distract you from pain or discomfort.

bookmark_borderPractical Tips When Moving Out Cleaning

Cleaning hacks for moving out of a rental property

Moving house is always a hassle. While a landlord can’t withhold your bond on the grounds that your house has not been cleaned, it is important that you leave the property reasonably clean and tidy. If you’ve got a few problem spots you’d like to fix, this round-up of cleaning hacks will help you get your place in tip-top shape in no time!

Walls

Check your walls thoroughly for any marks or scuffs. Most of the time these will come off quickly and easily, the CHUX Magic Eraser is a godsend if they’re a bit stubborn. If they won’t budge, try find an emulsion of the same colour.

The Fridge

It’s the one appliance that’s always working hard to keep food fresh and is often subject to spills, stains and sticky fingers. A clean fridge is a happy one, so see our guide on how to give it a deep and satisfying clean.

Tiles

Whether it’s your kitchen splashback or bathroom tiles, stubborn dirt and grime can be tough to remove. Follow these simple steps to find out how to get your surfaces sparkling!

Windows

Although you’re not required to clean your exterior, first impressions count and giving your windows a wash is always a good idea. If you’re wanting a thorough step-by-step guide


Cleaning when moving out

Moving out? We have made a list of things you must remember to clear and clean before moving out.

Clear

Remember to clear all your belongings before moving out. Your room/flat must be clear and tidy and must be up to the same standard it was when you moved in.

Bathroom: Remove all your belongings, including empty bottles and containers.

Kitchen: You will have to empty the kitchen cabinet that you used. Remember to empty your part of the refrigerator and freezer. Also, remember to empty the rubbish.

Wardrobe: remember to clear your wardrobe if you have a private one outside of your room. It is not allowed to leave private furniture in the residence.

Storage room: If you have access to a private storage room, remember to empty this before moving out. Also check out the common storage room if there is any. Do not forget your bike if you have one stored in the storage rooms.

If you wish leave kitchen utensils, food or other things behind to those you have shared a kitchen or bathroom with, it is a nice thought, but remember to ask your roommates first.

Clean

Before moving out, it is important to clean your residence well, so that the student moving in after you can move in to a clean and nice flat.


Moving Out

Expectations

The expectations of your vacancy is that the property will be left in the same move-in ready condition as when you moved in.  This requires a DEEP CLEAN by you or a cleaning company.  In order to facilitate this, you will need to spend many hours cleaning and completing your obligations per your lease and move out procedures.  If you are hiring a cleaning company to deep clean the property for you, please make sure to provide them our cleaning checklist or have them email us with any questions.  If they do not clean to our standards, charges will still be charged to you.  Ultimately, it is up to you to make sure they clean to our standards.

Due to the Covid-19 virus, we will no longer be conducting any in-person pre-inspections. Additionally, tenants will not be allowed to be present inside the property during the final inspection because of the government issued social distancing requirements. For these reasons, it is even more important to follow the guidelines, checklists, and helpful videos we have provided to ensure you get the highest return of your security deposit. We will be sending a “pre-inspection” app to you in the days before your lease end date for you to complete to help you in the process of final checkout. Please be sure to check your email every few days for these helpful tips forth coming.

One Month Before Your Move-Out Day

Start cleaning the big items.  Kitchens, bathrooms and lawn care (if applicable) require the most time.  Starting in those areas weeks in advance will help minimize the time you spend cleaning when the final move-out time comes.  The average 3-4 bedroom home takes 40-60 hours of cleaning to usually get it to our move-in ready standards.  1-2 bedroom apartments can be done in 15-20 hours typically.  Don’t expect to start cleaning the night before your 9 AM move-out and be done in time.

Review the MOVE OUT GUIDE which includes a cleaning checklist and items needed to complete the job properly.

1 Week Before:

Mail – please provide the post office with a forwarding address.

Cable TV/Internet – Do not forget to return your TV/Internet equipment to the service providers unless it came with your property.

Review the email notification you were sent with your final inspection walk through time.  It is not required that you are there for the final inspection, but you are welcome to do so if you’d like. (please see email being sent in April for 2020 move outs in regards to Corvid-19 procedures)

Review the move out/cleaning lists/videos on our website for helpful reminders to maximize your security return.

You should have all your personal belongs out of the property 1-2 days in advance so that you can deep clean properly.

Complete the Security Return Bank Form – this is so we can deposit any security return you have forthcoming.

2 Days Before:

Utilities – you can discontinue service to your utilities the day AFTER your move out. If your move out/end of lease is Friday, Saturday, Sunday or a holiday – you will need to turn your utilities off on the next business day. DO NOT DISCONNECT UTILITIES EARLY or you will be charged an early disconnect fee. DO NOT schedule the service to be shut off the day of your move-out or before.

Remove your personal belongings to allow time to deep clean.

Review our Move Out Packet with contains a cleaning checklist.

Vacuum thoroughly- TWICE. The carpets will be professionally cleaned after you move out as per your lease, so please do not steam clean/shampoo yourself. But, please remove all debris and vacuum thoroughly or additional charges may apply.

Dispose of non-household furniture at a proper location. Do not use the dumpster to discard any large items or furniture.  Please bring all furniture/large items and recycling to Waste Management

Replace these items before you leave to avoid extra charges:

Burned out light bulbs – if ceilings are too high to replace, leave new bulbs on the kitchen counter. All bulbs must be of similar type and L.E.D.

Batteries (smoke alarms) – Missing or dead smoke/carbon monoxide detector batteries. If ceilings are too high to replace, leave the new batteries on the kitchen counter.

Batteries (thermostats) – All thermostats that require batteries and are under 50% at the time of vacancy are required to be changed by tenants.

Oven drip pans – that are size appropriate to the appliance.

Furnace Filter(s) – if you have a forced air furnace, and have access to it, you are required to replace the furnace filter at time of vacancy.


Moving Out

A tenant must move out by 1 p.m. on the last day of the tenancy (usually the last day of the month). A landlord and tenant may agree on another time or date – as long as it’s in writing and signed by both parties.

Overholding Tenants

A tenant who continues to occupy a rental unit after the tenant’s tenancy is ended is called an overholding tenant. The landlord continues to be entitled to payment for use and occupancy when a tenant overholds. In this case, the landlord may apply for dispute resolution seeking an order of possession and accept payment for use and occupancy while awaiting dispute resolution.

When accepting payment for use and occupancy, the landlord should state in writing that:

The payment for rent or utilities is being accepted for use and occupancy only – it does not cancel the notice to end tenancy

The tenant must still move out

Note: The “use and occupancy” arrangement is short-term—it allows use and occupancy only for the period of the payment and does not reinstate the tenancy.  If, in a dispute resolution hearing, a party claims that tenancy has been reinstated, an arbitrator will consider all the circumstances including the intent of both parties when exchanging payment

Clean the Unit

A tenant should check their tenancy agreement and ensure they comply with any specific responsibilities for cleaning a unit, as set out in the agreement. A tenant is expected to clean the inside of their rental unit – even if it wasn’t clean at the beginning of the tenancy


How much does a professional move out cleaning cost?

People often ask how much a move out cleaning including a handover guarantee will cost. However, calculating the costs for the move out cleaning isn’t that easy, as various factors have to be considered. Therefore, there is no simple answer to this question, but we will do our best to explain how the costs are calculated.

What factors influence the price of a move out cleaning?

It is often assumed that the size of the apartment has the greatest impact on the cleaning price. However, this is rarely the case and the following factors influence the price the most.

KITCHEN

The kitchen requires a lot of time and effort as it’s the place where people cook. It is one of the most time-consuming rooms to clean and nowhere else, during the apartment handover, is paid as much attention to detail as in the kitchen. The standard kitchen move out cleaning routine involves: a thorough cleaning of the oven, dishwasher, stove as well as all cabinets and drawers. The inside of the extractor fan must be cleaned and the filter needs to be replaced. The floor must be cleaned and if you have with metal fittings, it’s important that they have been thoroughly descaled.

BATHROOM AND TOILET

Compared to other rooms, the bathroom also takes a lot of time to clean. The more toilets, bathtubs and showers your home has, the higher the price. Bathrooms (shower, bathtub), sinks and taps are particularly susceptible to lime. Due to increased humidity and lack of air circulation in the bathroom, mold may form in joints or corners. Therefore, the bathroom is checked very carefully during the handover, to see if everything has been cleaned properly.

WINDOWS AND LEDGES

Everyone knows the annoying subject of window cleaning. Windows need to be immaculately cleaned and no residue must be visible. Additionally, window frames must be cleaned inside and outside. It is also necessary to vacuum and clean between the rubber gaskets and the closing mechanisms of the windows. Lastly, any discolouration of the window ledges needs to be cleaned.

bookmark_borderHow To Get Rid Of Annoying Ants

How to Get Rid of Ants in Your Home and Yard

Ask homeowners to name the pests that give them the most headaches, and near the top will likely be one pesky small insect that invades and colonizes their yard by the thousands.

Ants

They move in with rows of marching soldiers carrying away your picnic and building dirt mounds marking the landscape of your lawn like hill forts. And no one says “hurrah” to fire ants, which can pack a powerful sting.

Those mounds can suffocate the grass underneath the dirt and the ants themselves can bite pets or kids just trying to enjoy the lawn.  If the infestation gets bad enough, you’ll have to launch an offensive of your own, and root out the invaders.

Identify Your Ant Species

Knowing who you’re dealing with is key when trying to get them off your lawn, and it’s the first step to solving your ant problem. Many species of ants take up residence in America’s lawns

Fortunately, many of those species don’t require any sort of control. They have a place in the ecosystem and a job to do. Ants are social insects, living together in vast colonies. But it’s when those ants start to build mounds in your yard or invade your cupboards looking for dinner that they start to become a pest.


Complete guide for ants control

ant prevention tips, ant removal cost, ants control, ants in the kitchen, are ants poisonous, best home remedy to get rid of ants, do ants get worse when it rains, do it yourself ant treatment, get rid of ants permanently, getting rid of ants, how do ants communicate, how does ant bite looks, how long do ants live, How much is pest control for ants, how to get rid of ants in your house, how to know if you have an ant infestation, how to stop an ant infestation, natural way to get rid of ants, remedy for ants at home

What are the types of ants?

Carpenter Ants

Enjoy resting at areas that are moist, damp or decaying

Body is black in colour

Diet preference include sweet substance, dead insects and protein.

Build nests within good, and tends to confuse with termites as a result

Sugar Ants

They are translucent and pale in colour

Favourite nesting area includes wet and moist spaces such as kitchen, flower points

Food sources include sweet and greasy substance and insects

Comes in group or colony

Crazy Ants

Comes in greyish in colour

Nest around outdoor largely, typically at woody and soil area

Enjoy damp and moist conditions

Feed almost on anything, such as sweet and protein matters, and insects

How are ants invited to a home?

What attracts ants in a home? What do ants eat and feed on? Just like humans, pests such as ants require three basic survival elements, namely food, water and shelter. This also explains why the kitchen, living and dining room is ants’ favourite hangout. Here is a list of common causes of ants’ infestation.


Ants don’t have to be a bother inside. Get rid of ants naturally.

Ants. They come out in swarms during late spring and summer – when love is in the air.

Large winged female ants, destined to become queens, mate with large winged males and then establish new colonies – preferably close to a food source. Like your house or apartment.

Prevention is the best line of defense

There are different types of ants—tiny dark brown nuisance ants and big black or black and red carpenter ants—and both are attracted to water, grease, sweets and food crumbs. Make your place as unappealing as possible to both kinds.

Inside: Keep counters clean and food sealed

Regularly wipe down all food prep areas. Sweep or vacuum the floors.

Thoroughly rinse recyclable food containers before tossing them. Empty trash, compost and recycling containers daily.

Store food – for both people and pets – in tightly sealed containers. Plastic wrap, paper and cardboard won’t deter ants.

Keep an eye out for plumbing leaks that may need repair. Fix leaks promptly—before foraging scout ants find them.

If you do see single, wandering scouts, wipe them up with a soapy cloth or sponge.

Outside: Seal cracks and keep a clear path around the foundation

Deter ants from entering your home by sealing cracks and holes around windows, doors and foundations.

Keep plants and trees from touching the exterior of the building so that ants can’t use them to climb inside. And clear debris, wood, and bark chips from the foundation.

Repair rotten or weather-damaged wood siding. Wooded parts of the home should not contact the soil. Carpenter ants love to burrow into rotting wood in search for a good nesting spot.

Sprinkle Diatomaceous earth around foundations, door frames, window sills or on visible ant trails. It’s non-toxic to humans and pets but will kill ants.

Invasion in progress: Use a borax-based bait

Infinite numbers of workers are in the nest ready to replace what you wash away. “You have to feed the colony to wipe it out,” he says. Use bait stations – like Terro–with borax as their active ingredient. Borax is a non-carcinogenic mineral. But the small doses of it used in bait stations are lethal to ants.


Complete Guide: How To Get Rid Of Ants In The House

Springtime is wonderful. It brings new sunshine, spring flowers but it also brings the dreaded ant season. There are a large variety of ants that invade our homes and gardens and the shear amount can be irritating and frustrating. With numerous ways for them to enter – floors and foundations, crevices in the walls or ceilings – in fact any holes that are an opening to attractive smells and food, ants can appear in their hundreds.

With so many it can feel like a tall task to get rid of ants in your home but there are some great, effective ways to prevent, deter, and eradicate an infestation. The last thing you want is to have them crawling all over your kitchen and living spaces so here are some different ways to use homemade, cheap alternatives to get rid of those pesky ants once and for all.

Preventing An Ant Invasion

The first thing you can do is to make sure you do as much as you can to prevent an infestation or stop an infestation getting worse. By doing a few simple preventative tasks, you can get yourself on the way to an ant-free house.

Keep your house clean by sweeping floors of food and dirt.

Keep trash and rubbish away from the house and make sure you put any rubbish out on a daily basis.

Don’t allow moisture on surfaces – ants like to find sources of water and tend to stay near them.

Always cover food when it’s not in the fridge.

Don’t leave dirty plates and utensils around – wash them up straight away

Deterrents For Ants In Your Home

There are many substances that ants just don’t like and using these can deter ants from certain areas like the kitchen, or you can use these methods outside your house if you know of a particular way they are getting in


Everything You Need to Know About Ants

Pharaoh Ants

These dumpster divers are the ants most likely to spread disease pathogens in hospitals and other healthcare facilities. Pharaoh ants are a common insect that find their way into homes. Here are some common characteristics to help you identify them.

They are yellowish to orange in color

Are approximately 1/16 inch long in length.

The diet of pharaoh ants consists of foods containing fats, proteins and sweets and they will forage for these items both in their natural surrounding outdoors and inside a home.

When pharaoh ants nest indoors they seek out conditions that are warm or humid and that are in close proximity to food and water.  Accessible areas such as wall voids, behind baseboards, under floors and even in furniture are all ideal locations for invading pharaoh ants.

Odorous House Ants

These ants are going to make quite a stink if you step on them, and often, you can’t help but step on them. Here is how you can identify odorous house ants in your home.

The odorous house ant is native to our state and is often considered the most common home invading species of ants.

It measures about 1/8 inch long

It is dark brown to black in color

The odorous house ant is most often recognized by the coconut-like odor it emits when crushed.

They feed on honey dew and plant nectar found outdoors, however, these irritating pests will invade homes in large numbers to find food when their usual supply runs low.

Indoors odorous house ants can be found constructing nests in wall voids, especially around hot water pipes and heaters, in crevices around sinks and cupboards as well as behind siding and stucco.

Pavement Ants

For this type of invasive ant, its name speaks for itself. These ants build colonies under pavement, in sidewalks, and under concrete slabs. This often brings them into homes through basement walls. First introduced by early European colonists, pavement ants have since become a regular invader of residential dwellings.

Pavement ant workers are generally about 1/8 inch long

They range in color from brown to black.

To an untrained eye it may be hard to see, but, pavements ants feature parallel furrows and ridges on their head and thorax.

Their palate is not exactly refined, as they will eat just about anything including other insects, honeydew, seeds and people food. They do prefer meat and grease when they have the option.

Their nests are commonly located in or under cracks in pavements as well as in soil beside driveways and sidewalks.

Inside, however, pavement ants are likely to be found nesting in walls, in insulation and under floors and in the wintertime areas that are near a heat source appeal to these ants.